A few weeks ago we spent Easter weekend removing the truck engine. We started on Friday and worked till mid-afternoon, and then worked some more on Saturday. The following weekend I sold the engine where it will go into another pickup similar to mine. I am happy that it can be recycled that way.
In the rest of this post I'll tell you about the engine removal process, but there is nothing special about it. Nothing blew up or caught fire so don't get your hopes up. At the end I have two videos, one of which is a time lapse which is kind of fun to watch.
Weigh-in
We started off by attempting to weigh each wheel. I wanted to know how much the truck weighs before and after we remove the engine and all related parts. Later when we finish the conversion I want to weigh it again so in the end I will know how much weight was removed and how much added.
We have no fancy equipment and I was not able to take it to a race shop to have it weighed. So we had to do the best we could with a bathroom scale and some physics. The scale could go up to about 300 pounds. We figured each corner would not be over 1000 pounds so if we divide by 4 we can keep it in range of the bathroom scale. The scale was a little better than a simple flat bathroom scale. It was a beam balance scale.
By using a lever between the wheel and the scale we can use physics to establish a ratio of weight of the wheel to weight that is applied to the scale. We chose a ratio of 1/4. Here is a picture of one of the wheels as we weighed it.
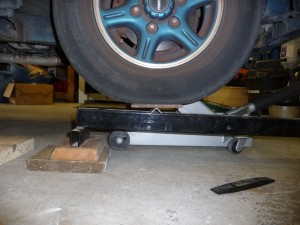
Wheel sitting on lever, for weighing
In this photo, you can see the lever fulcrum on the left, resting on some blocks. Then the wheel itself (the tire) is sitting on a metal plate that is then sitting on a piece of angle iron on the lever. The angle iron provides a point contact for the force, instead of spreading it out over a wider contact area. Off to the right, not visible in this photo, the other end of the lever is resting on the scale, also using angle iron to make a point contact. We carefully measured the distances each time we weighed a wheel.
Here is another photo showing the measurement setup for a wheel.

Lever and scale apparatus for weighing a wheel
We placed blocks under all the other wheels so that all the wheels would be at the same height. Here is a photo that shows the truck with blocks under all the wheels, and with one wheel being weighed.

Truck on blocks, weighing a wheel
We tried to be as careful as possible to keep the truck level, and to measure everything we did for each wheel. We even labelled the blocks and recorded which ones were used for which wheels and the order that we did things.
Here is a summary of the result. Weight before: 3024 pounds. Weight after: 2443 pounds. Net loss of 581pounds. There are a couple of notes. If you are observant you will notice in the photos that we removed the transmission. But the transmission will stay with the truck so it needs to be included in the after weight. So we weighed it separately and found it weighs 100 pounds. The above "after" weight includes this adjustment. Also, when we weighed the right rear wheel after removal, it was the same weight as before. Later we discovered the zero-balance weight had been moved on the scale so we think that measurement was not accurate. If we extrapolate from the change made for the other wheels, then it should be an additional 100 pounds removed for a total loss of about 680 pounds. The "after" weight is after everything associated with the ICE has been removed, including fuel tank and exhaust system. The before weight included about 2 gallons of gasoline.
Removal
Enough about weighing the truck. Bill has an engine hoist in the ceiling of his shop. This is very handy.
The rest is pretty boring. We removed the hood and started disconnecting everything that was connected to the engine.

Disconnecting stuff from the ICE
About 80% of this was pretty easy. All the wiring had connectors that we were able to disconnect without cutting. Most of the hoses we easily disconnected but we had to cut a couple of them. Getting the radiator out was a little tricky. It was like a puzzle with a bunch of interlocking pieces, all dependent on each other. For example there was a fan shroud that had to be removed first and that took a while because the fan held it in.
We finally got the radiator out.
I don't think I could have timed this any better. The radiator had been developing a slow leak and it was just about not usable after my last drive to the shop. I used it about as long as I could and no longer. By the way, it turns out this thing is made of plastic. And it is about 18 years old. That impresses me.
We were able to get some of the exhaust pipe bolts out but mostly they were too rusted together to be unscrewed. This is where the sawzall comes in handy.
We knew that the exhaust system would not be reused so no concern about cutting it. So I got under the truck and cut enough pieces that it was no longer in the way of engine removal.
This next photo shows part of the engine with everything removed. Notice the part down near the bottom, on the left, with the shaft that is at an angle. That is the power steering pump and I am keeping that. We disconnected it from the engine and kept it with the vehicle. No hoses were disconnected so the power steering system is still intact. My current plan is to couple it to a small electric motor and use that to turn power steering on and off as needed. Details to be worked out.

Power steering pump disconnected from engine
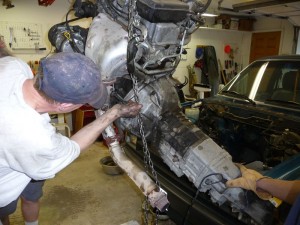
After everything was disconnected, we attached the chains and started lifting.

Lifting chains attached to engine
This took a while because we had to be careful about how it was oriented as we pulled it out. We would lift a little then reposition things, then lift some more. We also ended up moving the truck back and forth a little. The stickiest part was the transmission underneath. It took a while to get all that clear enough to be removed. Thanks to Bruce for spending a lot of time under the truck to help with that.
After that we lowered the engine onto a small rolling stand. We removed the transmission because I need to keep it. We also had to disconnect the remains of the exhaust pipe. Then it was pretty much ready for the guy who was going to buy it.
All of this took the better part of one day, Friday.
Truck bed and fuel tank removal
The next day, Saturday, we wanted to remove the fuel tank. To make this easier we removed the truck bed.

Truck bed removed from vehicle
To me the truck looks really funny without the bed.
We worked to remove the fuel tank so we could get rid of the last vestiges of the ICE. Also, the guy buying the engine said he would take the fuel tank too. So that saves me trouble of getting rid of the fuel tank.
Getting the fuel tank out was trickier than I expected. The main problem is there were multiple hoses going from the tank to the engine compartment. It took a while to get all these removed without damaging anything. These ran near the brake lines so we wanted to be cautious.
In this next photo, Bill is removing a bracket that was used for holding part of the exhaust system. It is not needed anymore so that will save some weight. Also, we will likely use that space for batteries.
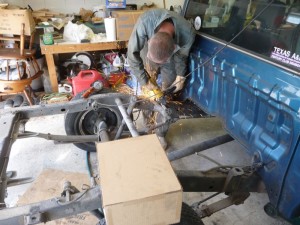
Removing exhaust system brackets
By the way, in the photo above you can see a cardboard box. This is a mock-up of one battery pack of 5 cells. I will have 8 of these in the truck. We made the mock-up to get an idea of how big they were and how we can fit them in the vehicle. We think we can get 4 in the back under the bed, and 4 in the engine compartment.
Farewell to the engine
The following weekend, the engine buyer came and picked it up. I'm happy to know that it will be used in another truck rather than just being junked in a salvage yard.
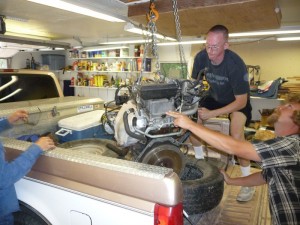
Loading engine into buyer's truck
Videos
I have a couple of videos this week. The first one is about 4 1/2 minutes and shows the overall removal process.
(Quicktime version)
YouTube version:
The second one is about 3 1/2 minutes long and is a time lapse from a fixed camera.
Quicktime version:
YouTube version:





Comments
There are no comments yet.